Crowd Content is now Stellar. Learn more here.

Writer Onboarding Checklist

Two men collaborating on a laptop project on an orange background

Initial Communication

Welcome and Introduction

  • On-site: Schedule an in-person meeting or orientation session.
  • Remote Employment: Arrange a virtual welcome meeting via video conferencing.
  • Remote Freelance/Contract: Send a detailed welcome email with an overview of key information, including the company, project, expectations, and contacts.

Reminder: Ensure Legal Clarity
For freelancers, clearly outline payment terms, scope of work, and timelines in the contract to avoid any future misunderstandings.

Legal Documentation

  • On-site: Provide physical copies of contracts and NDAs during the first meeting.
  • Remote Employment: Send electronic versions of contracts and NDAs to be signed digitally.
  • Remote Freelance/Contract: Include NDAs, payment terms, scope of work, and project timelines in the contract. 

Access and Setup

Tool Access and Workspace Setup

  • On-site: Set up workstation with necessary hardware and software; provide building access and security passes.
  • Remote Employment: Guide the setup of remote access to company systems, VPN, and software. Send equipment or allowance if applicable. 
  • Remote Freelance/Contract: Ensure access to project management and communication tools, and provide any necessary software licenses.

IT and Security Protocols

  • On-site: Conduct a brief training session on data security and IT protocols.
  • Remote Employment: Provide guidelines on secure access, including password management and data protection.
  • Remote Freelance/Contract: Emphasize the importance of secure data handling and provide resources for secure file transfer.
  • Additional Notes: Introduce and provide training on any time tracking or productivity measurement tools used by the agency.

Important: Set Up Secure Access
Make sure all writers, regardless of their location, have secure access to necessary tools and systems, prioritizing data security.

Orientation and Training

Agency Overview and Brand Guidelines

  • On-site: Host a workshop or meeting to discuss the agency’s mission, values, and branding.
  • Remote Employment: Share a recorded presentation or live webinar on the agency’s mission, values, and branding.
  • Remote Freelance/Contract: Provide detailed written materials and examples of the brand voice and style guide for the project(s) the writer will work on.

Tools and Software Training

  • On-site: Schedule in-person training sessions with IT or a dedicated trainer.
  • Remote Employment: Conduct virtual training sessions and provide access to online resources.
  • Remote Freelance/Contract: Offer video tutorials and written guides for essential tools.

Content Standards and Processes

Content Briefs and Editorial Guidelines

  • On-site: Organize workshops on interpreting and following content briefs.
  • Remote Employment: Use virtual workshops or detailed guides to explain content standards.
  • Remote Freelance/Contract: Provide comprehensive written guidelines and a point of contact for questions.

Quality Assurance Procedures

  • On-site: Detail the QA process and provide checklists.
  • Remote Employment: Share QA protocols through webinars or written documents.
  • Remote Freelance/Contract: Include QA expectations in the initial project briefing and feedback sessions.
  • Additional Notes: Explain how projects are assigned, transferred, or handed over between team members.

Integration and Engagement

Team Integration

  • On-site: Facilitate introductions and encourage participation in office activities.
  • Remote Employment: Use video calls for team introductions and virtual social events.
  • Remote Freelance/Contract: Include freelancers in relevant virtual meetings and communication channels.
  • Additional Notes: Assign a mentor or buddy to help new writers acclimate to the agency culture and processes.

Note: Inclusion Matters
Incorporate remote and freelance writers into team dynamics through virtual meetings and communication channels. This fosters a sense of belonging and improves collaboration.

Initial Assignments and Feedback

Assignment and Feedback Process

  • On-site: Discuss the first assignment in person and set a feedback meeting.
  • Remote Employment: Assign projects through project management tools and schedule a virtual feedback session.
  • Remote Freelance/Contract: Clearly outline deadlines and feedback loops via email or communication platforms.

Ongoing Development

Professional Development and Resources

  • On-site: Provide access to in-house training sessions and resources.
  • Remote Employment: Offer online courses, webinars, and virtual training.
  • Remote Freelance/Contract: Share access to industry resources and encourage participation in webinars.
  • Additional Notes: Establish a clear process for writers to provide feedback on the onboarding process and set up a system for ongoing feedback.

Documentation and Record-Keeping

Performance Tracking and Updates

  • On-site: Maintain records in HR or project management systems; conduct regular reviews.
  • Remote Employment: Use digital tools for performance tracking and documentation updates.
  • Remote Freelance/Contract: Keep detailed records of assignments, feedback, and contract terms.

Finalize Onboarding

Onboarding Completion

  • On-site: Conduct a final meeting to review the onboarding experience and address any questions.
  • Remote Employment: Schedule a virtual completion review and gather feedback on the process.
  • Remote Freelance/Contract: Send a final onboarding review form and schedule a call for any last queries.

The Writer Evaluation Tool

Two people collaborating at a table with documents, laptop, and coffee on a blue background

Add some objectivity to an otherwise subjective evaluation process. 

The Challenges of Evaluating Writers

The quality of your content directly impacts your marketing efforts, brand reputation, and audience engagement. But evaluating writers is no walk in the park. Here’s why:

  • Subjectivity of Writing Quality: Writing is subjective. What one person thinks is great, another might not.
  • Nuanced Evaluation Criteria: Beyond grammar and mechanics, there are more subtle elements such as voice, tone, engagement, and how well the content resonates with your audience. These are easy to miss but crucial for creating outstanding content.
  • Lack of Specialized Experience: Not every business has someone with the specialized skills to assess writing effectively. This can make it tough to spot truly exceptional writers among those who just meet the basics.

The Writer Evaluation Tool

To tackle these challenges, we’ve created the Writer Evaluation Tool. It’s designed to help hiring managers objectively assess freelance or in-house writer candidates. This tool offers a structured way to thoroughly and fairly evaluate a writer’s skills across critical content writing aspects.

The Writer Evaluation Tool covers 10 key categories:

  1. Audience Alignment
  2. Value and Helpfulness
  3. Engagement
  4. Originality and Creativity
  5. SEO
  6. Grammar and Punctuation
  7. Transitions and Flow
  8. Structure
  9. Research Quality
  10. Call to Action

Each category digs into important facets of writing quality and effectiveness, helping evaluators spot factors that might not be immediately obvious, especially for those less experienced in assessing writers.

Features

To ensure a comprehensive evaluation process, the Writer Evaluation Tool incorporates several key features. Below is an overview of these features, each designed to enhance the accuracy and fairness of your assessments.

FeatureDescription
Comprehensive Evaluation CriteriaThe tool evaluates writers based on 30 specific questions, providing a detailed assessment of their skills and capabilities.
Weighted Scoring SystemEach criterion is rated on a scale of 1 to 5, with point values weighted based on the importance of each question, ensuring critical aspects receive proper focus.
Automated CalculationsThe tool automatically calculates scores as you rate each question.
Optional NotesYou can add comments if desired, but it’s not mandatory.
Warnings for Poor RatingsIf certain questions receive a poor or fair rating, a warning appears, highlighting critical weaknesses that could outweigh a high overall score.
Score-Based DescriptionsAfter completing all ratings, the tool provides a final score with a description, helping you decide whether the writer is a good fit or if you should move on.

How to Use the Writer Evaluation Tool

Using the Writer Evaluation Tool is straightforward. Follow these eight steps to evaluate writer candidates effectively:

  1. Access the Tool:
    • Open the Writer Evaluation Tool in Google Sheets. This link will take you to a view-only version. To use it, you’ll need to make a copy.
    • To make a copy, click on File > Make a copy and save it to your Google Drive.
  2. Prepare for Evaluation:
    • Begin by reading the writer’s submission completely without stopping to rate. This helps you get an overall impression of the content.
  3. Rate Each Criterion:
    • For each of the 30 questions across the 10 categories, select a rating from 1 to 5:
      • 1 = Poor
      • 2 = Fair
      • 3 = Acceptable
      • 4 = Very Good
      • 5 = Excellent
    • Refer back to the content as needed to determine your ratings for each question.
  4. Add Optional Notes:
    • If desired, add any specific comments or observations in the notes field provided. This can be helpful for detailed feedback or context, especially if you’re keeping a completed scorecard for each candidate.
  5. Automatic Calculations:
    • As you input ratings, the tool will automatically calculate the scores based on the weighted values assigned to each question.
  6. Check for Warnings:
    • Pay attention to the warning section. If certain questions are rated as poor or fair (1 or 2), a warning will populate, indicating critical issues with the candidate’s writing that must be considered, regardless of their final score.
  7. Complete the Evaluation:
    • After rating all 30 questions and reaching 100% completion, the tool will display the final score along with a description based on the score range. This description will help you interpret the results and decide whether to proceed with the writer.
  8. Continue to the Next Evaluation
    • To reuse the same sheet, simply highlight the dropdown fields and press the Delete key to start again. 
    • To save and compare multiple evaluation results, enter the candidate’s name in the file name, then create a new copy for the next candidate by selecting ‘Make a Copy’ under the File menu.

Note: Keep in mind that no tool is perfect. Consider other factors such as the writer’s availability, reliability, and cost before making a final decision. Remember that one or two submissions are a small sample size, and they may not always be indicative of the writer’s true skill level.

We can help. Struggling to find the right writer or build a team capable of producing outstanding content at scale? Contact sales@stellarcontent.com and let us do the heavy lifting for you. With our expertise, you’ll have the support you need to create content that truly resonates with your audience and drives your brand forward.

Closing Sales Strategies for Content Services

Mastering the art of closing a deal means proving you’re the perfect solution to a potential client’s challenges.  With more than a decade of industry experience under our belt, we’ve perfected our closing system. 

Ready to learn our secrets?

5 Strategies for Effective Deal Closure in Content Services

Agencies need strategies that prove value to build trust, especially when your product is the effectiveness of the content you deliver. With the right tools in your arsenal, you can approach closing conversations with confidence.

  1. Highlight your experience with their unique requirements

With a wide array of agencies providing content services, those who stand out win the deal. Generic pitches about “quality content” get drowned out. Instead, hone in on what sets you apart during closing conversations.

When you work with a content provider, you specialize in everything. Tailor your closing so it focuses exactly on your prospects’ needs. You have the flexibility to provide much more than a small team of limited generalists. You’ve got an experienced team that suits whichever oddball scenario comes up, whether it’s: 

  • Case study production with face-to-face interviews
  • SME-reviewed agricultural thought leadership localized in three languages
  • Hyper-niche SaaS email campaigns with corresponding landing pages
  • High-volume SEO content with a tough-to-hit voice
Visual of Stellar’s quality promise with 95% vetting, training, and 100% satisfaction guarantee.
  1. Proactively address objections

Predicting roadblocks is critical to any closing sales strategy. You have to get ahead of common objections before they derail the conversation. Instead of hiding behind jargon, use concrete examples and custom samples to address concerns head-on.

Did a similar client have reservations about price? Demonstrate that the ROI exceeded their initial spend with a case study. Are they concerned about your grasp of a technical niche? Showcase your aptitude with a custom sample and put those concerns to rest.

Be prepared to overcome other common objections with our resource tailored specifically to content production. 

  1. Showcase success stories

Numbers speak volumes. Select a success story that spotlights measurable results. Skyrocketing website traffic, increased organic search rankings, and record-breaking lead generation are perfect examples. When prospects see the quantifiable impact of your content, it reassures them about ROI. This demonstrates your ability to be a catalyst for success.

Work with your team to compile a list of real-life statistics showcasing past project results, and keep adding to it as projects come and go. Having this list handy helps you build your prospect’s confidence that you’re the right choice for content production. 

  1. Adopt a consultative approach

Become a trusted advisor. Consulting your prospect, even in closing discussions, builds rapport and shows your primary focus is their success, especially when your advice conflicts with their strategy, demands, or workflows. Avoid the urge to agree when things don’t make sense just for the sake of winning the deal. It may work in the short term, but it can easily lead to mistrust and cancellations. 

  1. Utilize custom samples for impact

Stop talking to clients about what you can do, and show them. Custom samples turn your agency’s potential into an actionable asset. Doing this gives prospects a powerful reason to believe in your services. 

Custom samples help prospects:

  • Visualize the final product. Custom samples offer proof of your writing prowess and give you an opportunity to get the client back to the table for feedback. 
  • Assess quality and fit. Custom samples are solid evidence of your ability to adapt to a prospect’s brand voice and style
  • Trust you. Custom samples build trust by turning a one-sided sales pitch into a collaborative experience. Samples showcase your value up front and shift the focus away from cost to the results you can deliver.

Agency Sample Program 

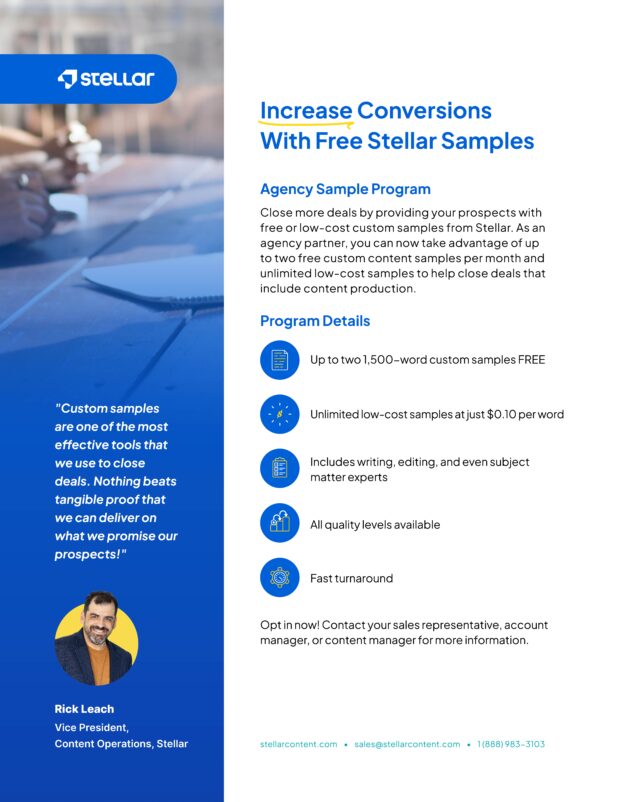
Stellar’s Agency Sample Program helps you close more deals by providing free custom content samples for prospective clients. This program offers verifiable proof of your ability to deliver exceptional content, building trust and demonstrating your commitment to their success. 

Let’s look at the benefits:

BenefitsDetails
Free samplesRequest up to two free samples per month (up to 1,500 words each).
Low-cost flexibilityUtilize unlimited $0.10/word samples for additional prospects.
Seamless integrationTailor samples to address prospect pain points and showcase your understanding of their needs.

Here’s how it works:

How It WorksDetails
Opt inContact your Account Manager to enroll.
Submit your sample requestShare your project details with your Account Manager via email. Include: Detailed content briefs and outlinesBrand and style guidesLinks to examples that illustrate your desired voice and styleAny other relevant resources
Streamlined workflowOnce we receive your request, our team carefully selects expert writers and manages the production process from start to finish. We provide a clear delivery date.
We deliverYou receive a premium sample, typically within 5 business days.
Close the dealImpress your potential client with tangible proof of your ability to deliver exceptional content. Custom samples build trust and accelerate the sales process.

Use Custom Content Samples and Close More Deals 

The best content service sales techniques don’t dazzle prospects with buzzwords. Instead, they prove your value and show clients you understand their needs.

Custom samples transform you from just another agency into a trusted, results-driven partner, and in our experience, conversion rates increase significantly when prospects agree to receive one. Let every sample be a proof point and testament to your commitment to client success.

Stellar flyer offering agency partners free and low-cost custom content samples to boost conversions.

13 Tips For Creating Effective Content Sales Presentations

woman a green background behind

A well-built sales deck makes it easier to close — and harder for clients to walk away.

If you’re selling content services, you’ll need to show how your agency tackles the things clients worry about most: hitting deadlines, sticking to brand voice, and keeping quality high at scale. Add today’s expectations around AI, and the stakes are even higher.

This guide breaks down how to structure your deck to address those concerns and make your pitch stick.

Tip #1: Start With a Strong Opening

Your opening slide sets the tone. It’s your first shot at showing you understand your prospect’s world and the challenges they’re up against. Whether they’re juggling multiple clients or managing inconsistent writers, the right opening can make them feel like you’re already in sync.

And today, that includes addressing concerns about content quality in an AI-saturated landscape. If you can demonstrate relevance in the first 30 seconds, you’ve earned the right to keep presenting.

Keys to Success

Narrative Tips:

  • Personalize the Greeting: Personalize your intro with the client’s name and a reference to their current challenges.
  • Lead With a Statistic or Fact: Lead with a compelling stat that highlights an opportunity or risk, especially one related to AI, SEO, or scalability.
  • Pose a Provocative Question: Ask a question that surfaces a pain point or misconception you’ll address later.

Deck Design Tips:

  • Visually Emphasize Key Points: Use bold visuals or text to highlight important statistics or questions right at the beginning of your deck.
  • Incorporate Brand-Specific Elements: Design the first slide to include elements from the client’s brand, such as colors or logos, to create an immediate visual connection.
  • Use an Engaging Hook: Start with an interactive element or multimedia content, such as a short video clip or an animated statistic, to capture attention instantly.

Examples

Example TypeExample
Personalized Greeting ExampleNarrative: “Good morning, [Client Name]. As a leader in [Client’s Industry], you’ve likely faced challenges in scaling your content needs. Today, we’ll show how our unique approach can transform those challenges into growth.”
Using Statistics ExampleSlide Title: “The Power of Content” 
Slide Text: “94% of B2B marketers create articles and blog posts. Almost 50% of buyers read a company’s blog when making purchase decisions.” Use engaging graphics and animations to highlight these figures.
Using a Provocative Question ExampleCombination: Slide: “Is Your Content Performing as Expected?” 
Narrative: “Have you ever wondered why, despite significant investment, your content isn’t performing as expected? Could it be a misalignment in content strategy and execution? Let’s dive into how targeted content creation can turn that around.”

Tip #2: Clearly Define Your Value Proposition

Your value proposition is the core reason a client should choose your agency over the competition. It concisely outlines the unique benefits your services offer and directly addresses the client’s main challenges and goals. A clear and compelling value proposition is crucial for convincing clients of the value and relevance of your services.

Keys to Success

Narrative Tips:

  • Articulate Unique Benefits: Emphasize what makes your services unique and how they specifically address the client’s needs and pain points.
  • Highlight Competitive Differentiators: Clarify what sets your services apart from competitors, focusing on your strengths like faster delivery, better ROI, or superior content quality.

Deck Design Tips:

  • Feature a Standalone Value Proposition Slide: Design a slide that clearly states your value proposition in a compelling and memorable way.
  • Consistency Across Slides: Ensure each slide contributes to reinforcing your value proposition, using consistent messaging and visual elements that relate back to the main proposition.

Examples

Example TypeExample
Value Proposition Statement ExampleNarrative: “Our content strategy increases your digital reach and engagement by leveraging targeted SEO practices and outstanding content creation uniquely tailored to resonate with your audience and exceed industry standards.”
Value Proposition Slide ExampleSlide Title: “Why Choose Us?” 
Slide Copy: For digital marketing agencies employing over 50 staff members in North America who aim to provide a diverse client base with premium editorial content, Stellar is a content creation service that delivers timely, SEO content, aligned with the tone and voice of each agency client’s unique brand. Unlike many freelance platforms or generic providers, Stellar ensures consistent quality and brand voice across multiple client accounts thanks to its editorial oversight, intelligent platform, and curated freelancer network.

Tip #3: Use Engaging Visuals

Visual elements are more than embellishments in a sales deck; they’re powerful tools that significantly enhance comprehension and engagement. A deck with strong visuals makes abstract ideas more concrete and maintains viewer interest throughout your presentation.

Keys to Success

Narrative Tips:

  • Explain Visuals in Context: When you introduce a visual, make sure to explain its relevance. This helps the audience connect the visual elements with the narrative of your presentation.

Deck Design Tips:

  • Quality Over Quantity: Choose premium images and graphics that look professional and enhance the clarity of your message.
  • Highlight Key Data Visually: Use charts, graphs, and infographics to make complex data accessible and understandable.
  • Consistent Style and Theme: Maintain a uniform style, color scheme, and typography throughout the presentation to reinforce your brand identity and professionalism.
  • Bring the Deck to Life: Consider lightweight video clips or subtle animation to highlight key metrics or workflows early in the deck or in key case study slides. Tools with built-in AI can also help automate these animations or generate data visualizations from raw input.

Examples

Example TypeExample
Visual Explanation ExampleNarrative: “As you can see in this graph (point to graph), our content strategies have led to a 50% increase in engagement for our clients within the first 3 months.”
Infographic Slide ExampleSlide Title: “Impact of Valuable Content”
Slide Copy: Include an infographic that shows a before-and-after scenario of client engagement metrics. Use contrasting colors to highlight the improvement and draw attention to the key metrics.

Tip #4: Keep It Concise

When attention spans are short, conciseness in your sales deck is key. Communicating your service’s benefits succinctly helps ensure your message lands and sticks.

Remember, rambling, poorly written slides might make prospects think you’ll deliver rambling content. 

Keys to Success

Narrative Tips:

  • Get to the Point Quickly: Avoid fluff and get straight to what matters most to your audience.
  • Treat Slides as Prompts: Use slide content as a launching point for discussion, not a script. Let the conversation flow naturally around key bullets.

Deck Design Tips:

  • Limit Slide Content: Stick to one main idea per slide with minimal text to keep the audience focused on your verbal presentation.
  • Use Space Efficiently: Adequate whitespace around text and visuals can help draw attention to the key points and make the slide easier to read.

Examples

Example TypeExample
Bullet Points ExampleNarrative: “In today’s session, we will cover three key benefits: increased engagement, improved SEO rankings, and enhanced brand consistency.”
Efficient Slide Design ExampleSlide Title: “Core Benefits”
Slide Copy: List the three benefits mentioned in the narrative with simple icons next to each: engagement (👥), SEO (🔍), brand consistency (✅). Keep the background clean and the text concise to ensure clarity and impact.


Tip #5: Tell a Story

Storytelling in sales presentations is a powerful way to emotionally connect with your audience, making your message memorable and engaging. A well-crafted story can illustrate the real-world benefits of your content services, turning abstract information into tangible and relatable ideas.

With AI-generated pitches becoming more common, real-world stories rooted in client outcomes help differentiate your agency as human, credible, and battle-tested.

Keys to Success

Narrative Tips:

  • Structure It Simply: Start with the challenge, explain your solution, then share the result. Keep it outcome-focused and easy to follow.
  • Relate to the Audience: Use scenarios or challenges your audience can identify with or has likely experienced. With content production, quality, voice, and reliability are usually a safe bet. 

Deck Design Tips:

  • Visual Story Elements: Incorporate visuals that support the story, such as images of people, places, or data that relate to the narrative.
  • Progressive Disclosure: Use slide transitions to reveal the story progressively, maintaining engagement and building anticipation.

Examples

Example TypeExample
Storytelling ExampleNarrative: “Imagine a content marketer struggling to meet deadlines and manage content quality. By partnering with us, they not only streamlined their operations but also achieved a 30% increase in lead generation within the first quarter.”
Visual Support ExampleSlide Sequence: Slide Title: “Before Our Help” – Show an image of a cluttered desk with multiple open documents and a stressed employee. 
Slide Title: “Our Intervention” – Display a flowchart depicting the streamlined content process we implemented. 
Slide Title: “After Our Help” – Present a clean desk with a relaxed employee and a graph showing improved engagement metrics.


Tip #6: Address Objections Up Front

Proactively addressing potential objections in your sales presentation enhances your credibility and demonstrates that your agency is knowledgeable and prepared. It shows you understand the client’s concerns and have thought through solutions, which significantly strengthens your proposition.

Keys to Success

Narrative Tips:

  • Identify Common Objections: Before the presentation, prepare a list of potential objections clients might have about your services, such as voice consistency, cost, speed, or how your team uses or doesn’t use AI. Our guide on overcoming content-specific objections with responses can help here. 
  • Incorporate Objections Into the Flow: Seamlessly integrate responses to these objections into your presentation to maintain the narrative flow and prevent disruption.

Deck Design Tips:

  • Highlight Solutions in Slides: Design slides that focus on how your services achieve specific positive outcomes, such as “Seamless Scalability” or “Ensuring Consistency With High-Volume Projects.” Avoid stating the objection in the slide.
  • Use Visual Aids to Reinforce Solutions: Employ diagrams, charts, and infographics that visually represent the effectiveness and benefits of your solutions. For example, a flowchart showing the streamlined content production process or a graph depicting ramp-up capabilities over time.

Examples

Example TypeExample
Objection Handling ExampleNarrative: “When it comes to the scalability of content production, we really shine. Our content platform and processes are designed to handle increasing volumes efficiently, and we have an expansive pool of writers and editors who can handle practically any volume without sacrificing quality.”
Solution-Focused Slide ExampleSlide Title: “Seamless Scalability for Every Project”
Slide Copy: Display a flowchart or diagram that illustrates your scalable content production process, emphasizing efficiency and quality control at each stage.

Tip #7: Highlight Case Studies or Examples

Case studies and real-world examples are powerful tools in a sales deck, providing concrete evidence of your agency’s capabilities and the results you achieved for clients. They serve as proof points that substantiate your claims and demonstrate your expertise in action.

Keys to Success

Narrative Tips:

  • Detail Specific Success Stories: Choose case studies that are relevant to the potential client’s industry or challenge to make them more impactful.
  • Focus on Measurable Outcomes: Emphasize the measurable benefits achieved through your services, such as increased traffic, higher conversion rates, or improved AIO rankings.

Deck Design Tips:

  • Use Visuals to Tell the Story: Incorporate charts, graphs, and before-and-after images to visually represent the success stories.
  • Keep It Relevant and Concise: Each case study slide must be focused and to the point, highlighting only the most crucial elements that demonstrate your agency’s effectiveness.

Examples

Example TypeExample
Case Study ExampleNarrative: “Our partnership with [Client Name] focused on developing a content strategy and on the production scale-up necessary to meet their seasonal marketing peaks. This approach increased their campaign reach by over 50% during the critical holiday season.”
Case Study Slide Example Slide Title: “Integrated Strategy and Production Success”
Outline the challenge: “[Client Name] needed to scale content production quickly without sacrificing quality during their peak season.
Detail the solution: “Implemented a combined strategy and production workflow that enhanced both the volume and quality of content.
Show results: Include a line graph depicting the increase in content output and engagement metrics before and after the intervention.


Tip #8: Include Social Proof

Social proof in a sales presentation can significantly enhance your credibility by showcasing widespread trust and satisfaction among your existing clients. This can include testimonials, ratings, and endorsements that reflect the effectiveness of your services.

Keys to Success

Narrative Tips:

  • Highlight Diverse Endorsements: Include testimonials from a range of clients to demonstrate broad applicability and satisfaction.
  • Emphasize Recognized Brands: If applicable, mention any well-known companies or industry leaders who’ve benefited from your services.

Deck Design Tips:

  • Create a Testimonial Slide: Design a slide dedicated to showcasing brief, impactful testimonials from satisfied clients.
  • Use Logos and Ratings: If you have permission, display client logos along with any industry awards or ratings that highlight your agency’s reputation.

Examples

Example TypeExample
Testimonial ExampleNarrative: “Our work with well-known brands like [Brand Name] has enhanced their digital content strategy and set new benchmarks for industry standards in content quality and engagement.”
Social Proof Slide ExampleSlide Title: “Trusted by Leading Brands”
Slide Copy: Display a series of logos from key clients, accompanied by select quotes that praise specific aspects of your service, such as reliability and quality. If available, include any relevant industry awards or recognitions that further bolster your reputation.

Tip #9: Demonstrate Flexibility and Scalability

Flexibility and scalability are crucial aspects potential clients look for, especially in content production. Demonstrating these capabilities reassures clients that your agency can adapt and scale solutions according to their evolving content needs.

Keys to Success

Narrative Tips:

  • Emphasize Adaptive Solutions: Highlight how your services can be custom-fit to different workflows, volumes, and content types.
  • Share Examples of Scalable Success: Discuss past scenarios where your agency successfully scaled its services to meet client demands.

Deck Design Tips:

  • Visualize Scalability: Use diagrams or growth charts to visually represent your agency’s capability to scale operations effectively.
  • Highlight Flexibility: Include slides that showcase different project scopes or adaptations you’ve successfully managed.

Examples

Example TypeExample
Flexibility Narrative ExampleNarrative: “For a startup client, we scaled our content production from 10 to 100 articles per month, adapting our strategy and workflow to maintain quality and meet growing demands.”
Scalability Slide ExampleSlide Title: “Scalable Solutions for Every Growth Stage” Slide Copy: Use a line graph showing the increase in content volume over time for a particular client, paired with key performance metrics to demonstrate maintained or improved quality.

Tip #10: Discuss Technology and Tools

Showcasing the advanced technology and tools your agency uses can significantly enhance your credibility and demonstrate your commitment to staying at the forefront of industry standards. This tip helps highlight your agency’s innovative approach and technical capabilities.

Keys to Success

Narrative Tips:

  • Detail Technology Benefits: Explain how specific tools and technologies you use enhance project efficiency, accuracy, and outcomes.
  • Connect Technology With Client Benefits: Make clear connections between your technological capabilities and the direct benefits clients will experience, such as faster turnaround times, clearer communication, or superior content.
  • Talk About AI: If your team uses AI tools for tasks like brief creation, voice calibration, or SEO optimization, be upfront about how they enhance — not replace — editorial oversight and creative quality.

Deck Design Tips:

  • Feature Technology Slides: Create slides that specifically highlight the technologies and tools you use.
  • Use Icons and Diagrams: Employ visual aids like icons and diagrams to represent technological processes or tools, making the information more accessible and engaging.

Examples

Example TypeExample
Technology Benefits Narrative ExampleNarrative: “Our use of advanced SEO tools and content management systems ensures your projects are not only optimized for search engines but also streamlined for faster delivery.”
Technology Slide ExampleSlide Title: “Cutting-Edge Tools for Superior Results” 
Slide Copy: Display icons or screenshots of key technologies, like AI content analysis tools or proprietary content creation platforms, with brief descriptions of how they contribute to project success.

Tip #11: End With a Clear Call-to-Action

A compelling call-to-action (CTA) is essential to conclude your sales presentation, guiding your audience on the next steps and encouraging them to take action. Whether it’s scheduling a follow-up meeting, signing up for a demo, or requesting a detailed proposal, your CTA should be clear and persuasive.

Keys to Success

Narrative Tips:

  • Be Direct and Specific: Clearly articulate what you want the client to do next and why it’s in their best interest.
  • Create Timely Relevance: Use time-sensitive offers, key upcoming dates, or project kickoff opportunities to encourage immediate action without relying on artificial pressure.

Deck Design Tips:

  • Dedicated CTA Slide: Design a standout slide that clearly states the CTA, using bold text and contrasting colors.
  • Visual Prompts: Include visual cues like arrows or pointing fingers that draw attention directly to the CTA text.

Examples

Example TypeExample
CTA Narrative ExampleNarrative: “To take the first step towards transforming your content strategy to content production, schedule a consultation with our team today. Let’s craft a content plan that propels your business forward.”
CTA Slide ExampleSlide Title: “Ready to Take the Next Step?” 
Slide Copy: “Let’s discuss how we can specifically tailor our services to meet your unique needs. Are you available for a follow-up meeting this week to explore this further?”

Tip #12: Practice Your Delivery

The effectiveness of a sales presentation often hinges on its delivery. Practicing your delivery ensures you convey your message clearly and confidently, making a strong impression on your audience.

Keys to Success

Narrative Tips:

  • Rehearse Regularly: Practice your presentation in realistic settings (like a Zoom call or conference room) to get comfortable with timing, transitions, and common interruptions.
  • Seek Feedback: Practice in front of colleagues or mentors and solicit their feedback for improvements. Record yourself for self-review. 

Deck Design Tips:

  • Prepare Speaker Notes: Use speaker notes to remind yourself of key points and transitions, helping smooth out your delivery. 
  • Timing Your Slides: Practice slide transitions to keep your flow tight and avoid lingering too long on any one visual.

Examples

Example TypeExample
Rehearsal Example (Narrative)Narrative: “As you rehearse, focus on the transitions between slides, ensuring each point seamlessly connects to the next, maintaining audience engagement throughout.”
Speaker Notes Example (Deck)Slide Title: “Key Strategies for Content Marketing” 
Slide Copy: Include brief notes under each bullet point to remind yourself of anecdotes, statistics, or questions to engage the audience.

Tip #13: Customize for Your Audience

Tailoring your presentation to the specific needs and context of your audience can significantly increase its impact. Understanding who you’re presenting to and customizing the content accordingly ensures your message resonates deeply and personally with potential clients.

Keys to Success

Narrative Tips:

  • Research Your Audience: Understand the business, challenges, and industry trends relevant to your audience to tailor your message effectively.
  • Adjust Examples to Fit: Use examples and case studies that are relatable to the audience’s sector, size, or specific needs.

Deck Design Tips:

  • Personalize Visuals: Adapt the design elements like colors, images, and data charts to reflect the industry or brand identity of the audience.
  • Interactive Elements: Include elements such as questions that directly engage the specific audience, making the presentation more interactive and engaging.

Examples

Example TypeExample
Personalized Example Narrative: “For your tech startup, we understand the challenge of constantly needing fresh, innovative content to keep pace with rapid market changes. We can scale our content production to match your growth phases, ensuring you always have engaging, relevant content that resonates with your tech-savvy audience.”
Interactive Slide Example Slide Title: “Custom Content Solutions for Your Business” Slide Copy: Include a visual flowchart that outlines a content production plan tailored to the business cycle of the prospect. Detail the steps such as initial content audit, strategy development, content creation, and performance review.
Propose a spot in the slide where you ask, “Does this align with your current content goals?” Encourage the prospect to interact by providing feedback directly during the presentation.

Content Production Client Onboarding Checklist

Two team members discussing project work with a laptop and phone on an orange background

Phase 1: Working Session

Tip: Prepare Thoroughly for the Working Session
Ensure you review all client materials and calibration content briefs in advance to lead a productive and focused session.

Schedule and Prepare for the Working Session:

  • Schedule a working session with key stakeholders (client, content production manager, client’s editor or content reviewer).
  • Send a detailed agenda for the working session, including key topics and goals.
  • Request and review the calibration content briefs (if applicable).
  • Review any existing client materials.
  • Prepare the working session deck.

During the Working Session:

  • Align on project scope and agreement terms.
  • Establish content goals and objectives.
  • Define the target audience and brand voice.
  • Outline the desired content structure and style.
  • Plan production logistics and timelines, including milestones and deliverables.
  • Advise on best practices for content creation, SEO, and quality control.
  • Schedule the calibration feedback call. 

Post-Working Session:

  • Create a working session summary document and share it with all stakeholders.
  • Request approval or corrections to the working session summary from the client. 

Phase 2: Preparation

Best Practice: Double-Check the Project Brief
Compare the project brief to the working session summary to ensure no key details are missed.

Develop the Project Brief:

  • Create a comprehensive project brief that includes content goals, target audience, brand voice, content structure, style guidelines, SEO requirements, and other writer-facing content details.
  • Compare the project brief to the working summary to ensure all overarching content guidelines are covered.
  • Request a review of the project brief by a writer or an editor to identify gaps or opportunities for clarification.

Create a Content Brief Template (if your team is creating the briefs):

  • Develop a content brief template that includes the appropriate components and aligns with the project brief.
  • Include specific instructions for tone, keywords, linking, audience segment, outline, and any other relevant details.
  • Request a review of the content brief template by a writer or an editor to identify gaps or opportunities for clarification.
  • Review the template with the person creating the content briefs to ensure understanding of expectations. 

Pro Tip: Use the Content Calendar to Stay on Track
A well-maintained content calendar ensures everyone stays aligned with deadlines and project progress.

Set Up the Content Calendar:

  • Establish a content calendar with deadlines for each phase of content production.
  • Include columns for data points or information needed by the content brief creator.
  • Include a status field to keep all parties up to date on progress.
  • Ensure the calendar is shared with all team members and the client.
  • Instruct the client on their role in the content calendar.

Build Tailored Workflows:

  • Create customized workflows for the project, detailing each step from content creation to delivery.
  • Define and communicate roles and responsibilities within the workflows, ensuring clarity for all team members.
  • Document and share the process, expectations, and timelines for each step in the workflow. 

Phase 3: Team Building

Note: Start Small, Then Scale
Begin with a small, focused team to iron out any issues before expanding to full-scale production.

Assemble the Writing Team:

  • Choose writers and editors ideally suited to the project’s subject, style, and structure.
  • Identify which writers and editors will participate in calibration. 
  • Provide calibration writers and editors with the project resources.
  • Communicate assignment day and completion deadline for calibration. 
  • Communicate project timeline to non-calibration team, but don’t share the briefs until after calibration concludes (due to likelihood of updates). 

Phase 4: Calibration

Focus: Use Calibration to Perfect the Process
Calibration helps refine the content and processes before full-scale production, so take the time to get it right.

Assign and Produce Initial Content:

  • Begin the trial run with a small batch of content to test project resources.
  • Assign content orders to the calibration writers and editors.
  • Instruct the writers and editors to follow the project and content brief explicitly. 

Review the Content:

  • Review the completed content to gauge the writer and editor’s understanding against your vision of the deliverable.
  • Identify any areas for improvement and make a note to update the resources (don’t update yet).
  • Adjust the content to match your vision.  

Deliver the Content:

  • Submit the content to the client for review.
  • Send a calibration feedback questionnaire to the client and request that it be returned at least 24 hours prior to the calibration feedback call. 

Important: Schedule a Calibration Feedback Call
This call is crucial for aligning with the client on content quality and ensuring the final product meets expectations.

Conduct the Calibration Feedback Call:

  • Conduct a face-to-face feedback call with the client. 
  • Discuss both positive and critical feedback to identify strengths and weaknesses in the content and processes.
  • Assess your understanding of the client’s vision of the final content against their feedback on the deliverables. 
  • Determine whether additional calibration is needed. 
  • If moving into ramp-up or full production, review cadence and submission decisions determined during the working session. 

Refine the Resources:

  • Make necessary adjustments to the project brief, content brief template, and workflow based on client feedback.
  • Communicate resource updates resulting from the feedback call to the writers and editors who created the content.
  • Share resources with the non-calibration writers and editors to prepare them for production. 

Alignment in Action: The Content Calibration Phase

Two professionals reviewing information on a tablet with a teal background

Ensure content and workflow precision through iterative feedback and adjustment.

What Is Calibration?

Calibration in content production is the process of aligning your work with the client’s vision. It ensures that the content meets the required quality, tone, style, and timing.

How Calibration Works

Calibration is the fourth phase of onboarding, following the working session, resource and workflow development, and team building. This stage involves testing content and workflows on a smaller scale to see how well they meet the client’s expectations. Feedback is then used to make targeted adjustments to content style, tone, and processes, ensuring everything is aligned with the client’s vision before full-scale production begins.

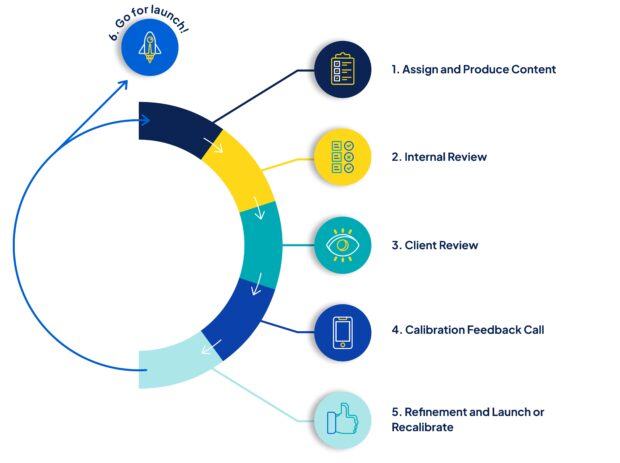
Here’s a high-level overview of the calibration process:

Workflow diagram showing six steps from content creation to launch
  1. Assign and Produce Content: Test how well the style guides, tools and other resources capture the content’s vision and requirements.
  2. Internal Review: Measure the writer’s and editor’s understanding against the content manager’s expectations.
  3. Client Review: Evaluate the content manager’s understanding against the client’s vision.
  4. Calibration Feedback Call: Gather positive and critical feedback to identify the strengths and weaknesses of the resources and processes.
  5. Refinement and Launch or Recalibrate: Repeat the process until alignment is achieved, then move into scaled production.

13 Tips for Effective Calibration

1. Rely on Your Resources

  • Let the project and content briefs guide writers and editors.
  • Calibration tests these resources to ensure they achieve the desired results.

2. Start Small, Scale Smart

  • For long-form content: Calibrate with 2-3 articles using at least two writers.
  • For short-form content: Calibrate with 5-10 pieces using at least three writers.

3. Timeliness Is Key

  • Begin the calibration process within 3-5 days of the working session to keep insights fresh.
  • Schedule the feedback call within 3 days of content delivery.

4. Face-to-Face Feedback

  • Always hold a face-to-face call for the feedback session to prevent misalignment from relying solely on written comments.

5. Focus on Actionable Feedback

  • Prioritize feedback that can be applied across the entire project, such as style guidelines or tone adjustments.
  • Avoid overemphasizing feedback that only pertains to specific articles.

6. Set Clear Client Expectations

  • Ensure clients understand that calibration is a test of the workflow and resources, not necessarily an example of the final output.

7. Agree on Readiness

  • Both the client and the content team should agree they’re comfortable moving into ramp-up or full production after calibration.

8. Embrace Iterative Improvements

  • Be prepared to make thoughtful adjustments based on feedback. Calibration is iterative, and fine-tuning is expected.

9. Maintain Internal Communication

  • Communicate resource updates from the feedback call to the writers who created the content to ensure everyone stays informed.

10. Use On-Target Samples

  • Once an on-target piece is created, include it as a sample in the project brief for future reference.

11. Continue Calibration in Ramp-Up

  • For high-volume or large-team projects, continue calibrating internally with each new set of writers.
  • Scale up those who demonstrate a strong understanding while starting slowly with new writers and editors.

12. Set Proper Expectations for Yourself

  • Understand that calibration can be a bumpy process. Misalignments may occur due to unclear expectations or misunderstandings.
  • Remember, calibration is meant to identify and resolve these issues.

13. Stay Flexible

  • Expect that adjustments may still be needed after calibration is complete.
  • Treat your project brief as a living document that will evolve over the life of the project.

Calibration Feedback Questionnaire

The calibration feedback questionnaire is a critical supplement to the face-to-face feedback process. 

It serves two essential purposes: 

  1. It allows the production team to review client feedback in advance and prepare questions for the calibration feedback call.
  2. It documents the client’s approval, providing a reference point for any future revisions. 

Calibration Feedback Questionnaire

We value your feedback and insights. Please take a few moments to complete this questionnaire to help us refine our processes and ensure we meet your expectations. Your responses will be reviewed before the calibration feedback call to prepare for an in-depth discussion.

Your Name and Role:

Company or Project Name:

Names and Roles of Others Who Reviewed the Content:

Rating Calibration Deliverables:

From 0 to 10, with 10 being exactly what you wanted, how would you rate the calibration deliverables compared to your vision of on-target content?

Rating Scale:

  • 0 – Not even close
  • 1
  • 2
  • 3
  • 4
  • 5
  • 6
  • 7
  • 8
  • 9
  • 10 – Perfect!

Please consider the different components that go into good content creation. Check off all items that met your expectations and leave blank anything that missed the mark. If an item doesn’t apply to your content, please check it.

  • Writing Quality
  • E-E-A-T Principles
  • Voice
  • Content Structure
  • Non-Keyword SEO
  • Keyword Usage
  • Internal/External Linking
  • Flow
  • Consistency
  • Organization
  • Logic
  • Expertise
  • CTA
  • Introduction
  • Conclusion
  • Adherence to Instructions
  • Length
  • Delivery Format

Feedback on Unchecked Items:

Please provide brief feedback on what must be done to align with your expectations on anything left unchecked. Give as much detail as you’d like, but note that you’ll have the opportunity to go into detail during the calibration feedback call.

Feedback on Checked Items:

Do you have feedback on the areas you checked that would help us produce even better results? If so, summarize it here. We’ll go into more detail during the call.

Comfort With Moving Into Scaled-Up Production:

Based on these deliverables, do you feel comfortable moving into scaled-up production?

  • Yes
  • No
  • Not sure. Let’s discuss during the call.

Uncovered Issues or Bottlenecks:

Has the calibration round uncovered issues or potential bottlenecks that weren’t considered prior to this point? For example, the need for brief creation, the time it takes to review deliverables, the number of people reviewing content, the need for images, or the need for a more customized deliverable?

Additional Feedback, Questions, or Concerns:

Please provide any feedback, questions, or concerns not already covered in your prior responses.

Contact page copy:

Calibration is where all the preparation comes together and production begins, but a crawl-walk-run approach is key to ramping up an at-scale project. For questions on calibration or client onboarding, contact your account or content manager. Prospective clients can connect with us at sales@stellarcontent.com

Developing Project and Content Briefs

Two men reviewing project plans at a table with a teal background

Create project and content briefs that keep writing teams producing stellar content that’s consistent with SEO requirements and brand voice. 

Table of Contents: 

  • The Importance of Briefs
  • Brief Component Table
  • 8 Common Pitfalls in Brief Creation and How to Avoid Them
  • 8 Best Practices for Using AI for Content Brief Creation
  • 7 Essential Tools for Content Brief Creation
  • 12 Guidelines for Creating a Project Brief
  • Creating a Content Brief Template: A 10-Step Guide
  • Project Brief Template
  • Content Brief Template

The Importance of Briefs

Begin your content project by defining its goals and deliverables with clear project and content briefs. These essential documents ensure alignment across your team and equip content creators with the guidance needed to meet strategic objectives and audience expectations. This step lays the groundwork for successful content creation, providing a solid blueprint for every piece produced.

Project Briefs

Project briefs are essential tools that provide a clear direction for the entire content project, ensuring all team members are aligned with the project’s goals, scope, and specific requirements. They contain high-level information crucial for guiding all content produced within a project:

  • Universal Guidance: Ensures every piece of content adheres to a unified strategic vision, including SEO, brand voice, and style.
  • Creative Boundaries: Outlines areas for innovation and strict compliance, balancing creativity with adherence to guidelines.
  • Consistency Across Content: Maintains a consistent approach to voice, tone, and style, enhancing brand coherence.
  • SEO Alignment: Includes vital SEO strategies that ensure content is enhanced for visibility and reach.

Content Briefs

Content briefs act as the tactical tools that translate the strategic insights of project briefs into actionable instructions for creating individual content pieces. They provide detailed guidance necessary to produce focused and impactful content:

  • Detailed Roadmaps: Offer precise instructions for each piece of content, ensuring alignment with project objectives.
  • Specificity in Execution: Address the unique requirements of each content piece, from structure to differentiation points.
  • Direct Knowledge Transfer: Convey specific insights, expertise, and strategic direction directly to content creators.
  • Enhanced Engagement: Tailor content to effectively engage the target audience and achieve specific business goals.
  • Prevention of Misalignment: Mitigate risks of misinterpretation and ensure content meets the intended business and audience needs.

Project Brief vs. Content Brief: Key Components

Our brief component tables outline the key elements of both project and content briefs, clearly distinguishing their roles in guiding content creation. This differentiation helps ensure clarity in overarching project goals and precision in individual content pieces.

Audience and Author Details

ComponentProject Brief worthy?Content Brief worthy?Considerations
Audience InsightsNoYesAudience insights aren’t about personas. This component details common pain points, what resonates with, or could possibly disappoint, the audience as it relates to the article.
Audience PersonaYesNoInclude demographics, sociographics, and psychographics. If the audience is segmented, identify the segment for the writer.
AuthorNoYesContent should be published under an individual’s name, ideally a proven SME on the subject. This informs the writer on how to approach the content.

Business Objectives and CTAs

ComponentProject Brief worthy?Content Brief worthy?Considerations
Business ObjectiveIf consistentYesSpecify desired actions like clicking links, signing up for newsletters, or building topical authority.
Call to Action (CTA)If consistentYesProvide direction on placement and frequency of CTAs. Ensure alignment with the business objective.
ContactYesYes (if specific)Writers should know who to contact for answers. Editor and project manager emails go in the project brief; specific subject matter experts go in the content brief.

Content Details

ComponentProject Brief worthy?Content Brief worthy?Considerations
Content PurposeIf consistentYesInform the writer of the search intent and what the reader should gain. Including the journey or funnel stage can help.
Content TypeIf consistentYesDefine the content type to lessen confusion, such as listicles, how-tos, white papers, etc.
DeadlineNoYesCommunicate deadlines clearly with date, time, and time zone. Distinguish between writer and editor deadlines if appropriate.

Differentiation and Linking

ComponentProject Brief worthy?Content Brief worthy?Considerations
Differentiation OpportunitiesIf consistentYesHighlight how to make content stand out from competitors, such as recent advancements, poorly covered subtopics, or a different viewpoint.
External LinkingYes (guidelines)Yes (specific)Provide specific links or directions.
Internal LinkingYes (guidelines)Yes (specific)Provide specific links or directions.

Legal and SEO

ComponentProject Brief worthy?Content Brief worthy?Considerations
Legal/Compliance GuidelinesYesFor exceptionsProvide thorough compliance guidelines in the project brief and highlight exceptions or specific requirements in the content brief.
Meta DescriptionYes (if writer creates)Yes (if pre-written)Provide guidelines or pre-written descriptions.
SEO RequirementsIf consistentYes (specific)Include keyword usage, optimization requirements, and SERP-feature targets.

Additional Components

ComponentProject Brief worthy?Content Brief worthy?Considerations
Notes/Special InstructionsIf consistentYesUse for any additional information not covered elsewhere.
OutlineNoYesProvide enough direction while allowing for creativity.
Point of ViewYes (broad)Yes (specific)Provide specific stance, opinions, and insights.
Primary KeywordNoYesInclude one primary keyword aligned with the subject matter and search intent.

Keywords and Analysis

ComponentProject Brief worthy?Content Brief worthy?Considerations
Resource & Inspiration LinksIf consistentYes (specific)Explain the purpose of each link.
SamplesYesNoIllustrate instructions and set quality expectations.
Secondary KeywordsNoYesTarget relevant long-tail keywords and synonyms.
SERP AnalysisNoYesProvide links to SERP competitors and findings.

Style and Visuals

ComponentProject Brief worthy?Content Brief worthy?Considerations
StyleYesNoInclude guidelines on perspective, language use, and stylistic elements. Use a Stylistic Exemptions or Special Notes component in the content brief for ad hoc changes to style.
TitleNoYesProvide the title and direction on its usage.
UpdatesYesNoSummarize recent updates and date entries.
VisualsIf consistentYes (briefly)Inform the writer of visual elements to ensure cohesiveness between copy and visuals.
Voice/ToneYesFor exceptionsCover variations thoroughly and avoid vague descriptions.
Word CountIf consistentYesProvide a reasonable range and instruct on word count limits.

8 Common Pitfalls in Brief Creation and How to Avoid Them

This section highlights eight typical challenges encountered during the brief creation process and provides practical solutions to avoid them. Understanding these pitfalls will help ensure your briefs are clear, effective, and aligned with project goals.

  1. Vagueness and Lack of Specificity
    • Problem: Briefs that are too vague don’t provide enough direction, leading to misaligned content and revisions.
    • Solution: Be specific with your details. Use clear, concise language and avoid open-ended instructions, especially when working with multiple writers who interpret instructions differently.
  2. Overloading With Information
    • Problem: Including too much detail can overwhelm writers, leading to key points being overlooked.
    • Solution: Prioritize information based on relevance to the specific content piece. Use bullet points for clarity and to emphasize important elements.
  3. Ignoring SEO Requirements
    • Problem: Neglecting SEO aspects results in content that performs poorly on search engines.
    • Solution: Clearly outline SEO keywords, desired content length, and any linking strategies. Integrate these seamlessly into the content’s narrative.
  4. Failing to Define Voice
    • Problem: Without a clear understanding of your brand voice, writers may produce content that doesn’t resonate or engage effectively.
    • Solution: Provide detailed voice attributes, examples, and audience personas in the project brief.
  5. Not Setting Clear Objectives
    • Problem: Unclear objectives result in content that fails to meet business or reader goals.
    • Solution: Define the business objective and search intent for each piece of content. Whether it’s driving sales, improving SEO, or building brand awareness, be explicit about what the content aims to achieve, and be sure the writer understands the search intent associated with your topic. 
  6. Inadequate Instructions for Call to Action
    • Problem: If CTAs aren’t clearly defined, the content may fail to convert readers.
    • Solution: Specify the type of CTA, its placement, and the action you want the audience to take. Ensure it aligns with the business objectives.
  7. Lack of Collaboration and Feedback
    • Problem: Briefs created in isolation may not cover all aspects or miss key inputs.
    • Solution: Involve stakeholders in the briefing process and ensure there’s a mechanism for feedback and revisions.
  8. Expecting Too Much From a Writer
    • Problem: Expecting a writer to determine your point of view or create content that reflects your expertise without providing sufficient information leads to generic content that doesn’t stand out from competitors.
    • Solution: Ensure your content brief instructs the writer on how to differentiate the content they’re going to write. Include SME insights, original quotes, or your business’s stance or opinion on the subject matter to ensure unique content. 

8 Best Practices for Using AI in Content Brief Creation

Leveraging AI can significantly improve brief creation by boosting efficiency and precision. To help you make the most of tools like ChatGPT, this list provides eight essential guidelines focused on quality, collaboration, and strategic use. These practices ensure you gain the advantages of AI while retaining control over content development.

  1. Collaborative Creation
    • Best Practice: Engage AI as a partner in the content brief creation process, rather than relying on it to generate briefs independently. Use it to refine and expand sections collaboratively, ensuring each part of the brief meets quality standards and aligns with strategic goals.
    • Tip: Ensure the person using AI to create briefs has the capability to create a brief manually. This ensures they can effectively judge and enhance the AI-generated output.
  2. Comprehensive Preparation
    • Best Practice: Before starting with AI, gather all necessary background materials such as SEO keyword research, audience data, competitive analysis, and content insights. This preparation ensures the briefs are grounded in strategy and informed by data.
    • Tip: Use AI to help organize these materials into a cohesive strategy that can be directly referenced in the brief.
  3. Iterative Review and Enhancement
    • Best Practice: Treat the initial AI-generated content as a draft to be refined. Carefully scrutinize each output before incorporating it into the brief to ensure precision and relevance.
    • Tip: Use AI to suggest variations and improvements on key sections like the call to action or outline, ensuring they’re optimized for user engagement.
  4. Quality Over Speed
    • Best Practice: Emphasize the quality of the briefs over the speed of their creation. Although AI can accelerate the drafting process, the focus should be on using AI to achieve a higher standard of clarity and strategic alignment.
    • Tip: Use off-the-shelf AI models such as ChatGPT, Gemini, or Claude effectively by providing clear and concise inputs each step of the way.
  5. Integration of Rich Information Sources
    • Best Practice: Incorporate detailed input such as quotes and insights from SMEs and summaries from strategic discussions to inform the AI’s output. Transcripts from SME interviews and webinars are particularly useful for injecting unique insights into content briefs, and transcripts from a working session help with AI-assisted project brief creation.
    • Tip: Use meeting tools that are able to produce transcripts to make information sharing with the LLM simple.
  6. Avoiding Overreliance on Automation
    • Best Practice: Be cautious of over-relying on AI for critical thinking or strategic decisions. Use AI to assist with data processing and suggestion generation, but keep strategic decision-making and final approvals in human hands.
    • Tip: Set clear guidelines for the human operator to ensure they guide the AI effectively, providing it with the information it needs to help create useful outputs.
  7. Step-by-Step Component Focus
    • Best Practice: Follow a step-by-step process when creating briefs with AI, focusing on one component at a time. This methodical approach helps maintain control over the quality and relevance of each section.
    • Tip: Provide AI with the necessary information for each component, review its output carefully, adjust or redo if necessary, and then incorporate it into the brief.
  8. Careful Outline Crafting
    • Best Practice: Be meticulous when using AI to create content outlines. While AI can generate comprehensive outlines quickly, they need to be guided by detailed input from the user.
    • Tip: Provide specific direction on how to differentiate the content, articulate the business’s stance or opinion on the subject matter, and specify the depth required for certain topics to ensure the outline leads to distinctive and competitive content.

7 Essential Tools for Content Brief Creation

Choosing the right tools is essential for streamlining and optimizing the brief creation process. This carefully curated list highlights tools that can support different stages of creating a content brief. Each tool is outlined with its key benefits, enabling you to build a technology stack tailored to your needs.

  1. Automated Keyword Research: These tools generate a list of relevant keywords based on the primary topic, helping ensure search engine optimization.
    • Semrush: Offers comprehensive keyword research, tracking keyword strategy against competitors, and provides SEO audits.
    • Ahrefs: Provides keyword suggestions, search volume, and keyword difficulty, along with competitive analysis and site audits.
    • Google Keyword Planner: A free tool that generates keyword ideas and gives estimates on search volume and competition.
  2. Content Outline Generation: Use these tools to create structured content outlines by analyzing top-performing content.
    • Clearscope: Generates content reports that help writers ensure their content aligns with search intent and industry relevance.
    • MarketMuse: Uses AI to analyze your content and compare it with existing content on similar topics to suggest improvements and keywords.
  3. Audience Analysis: Understand your audience’s needs and behaviors to tailor your content effectively.
    • SparkToro: Quickly discovers what your audience reads, watches, listens to, and follows.
    • SimilarWeb: Provides analytics on your audience’s online behavior, including traffic sources, geography, and user engagement.
  4. Competitive Analysis: These tools help identify content gaps and opportunities by analyzing your competitors’ content strategies.
    • BuzzSumo: Analyzes what content performs best for any topic or competitor, offering insights into popular trends and content engagement.
    • SpyFu: Provides insights into the search marketing formulas used by your most successful competitors.
  5. SEO Suggestions: Get recommendations for optimizing your content for search engines.
    • Yoast SEO: A WordPress plugin that provides real-time page analysis to enhance your content, images, meta descriptions, and more.
    • Surfer SEO: Analyzes your pages against the top 10 ranking pages to suggest optimal keyword density, common words, proper content length, and more.
  6. Quote Gathering: Tools and platforms to source expert quotes and insights can add authority and depth to your content.
    • Qwoted: A platform that connects media and content creators with industry experts to source quotes and insights.
    • SourceBottle: A free service where journalists and bloggers find sources for stories and content, including expert quotes.
  7. Transcription Tools: Convert audio from interviews and webinars into text to easily extract insights and quotes for content briefs.
    • Otter.ai: Provides accurate real-time transcription services and includes features for sharing, editing, and organizing transcripts.
    • Rev: Offers audio and video transcription services with high accuracy, delivered by human professionals, suitable for detailed content creation.

12 Guidelines for Creating a Project Brief

This process guides you through the creation of a project brief, starting from the initial client interaction in the working session to the finalization of a comprehensive document. These 12 guidelines ensure all essential information is gathered, organized, and articulated in a way that guides your content team to successful content production.

  1. Prepare for the Working Session: Utilize the working session deck and agenda provided in our resources to guide the discovery process with the client. These tools are designed to help gather comprehensive information about the project’s goals, audience, desired voice, and content structure effectively.
  2. Conduct the Working Session: Engage in a detailed face-to-face meeting with the client, using the prepared materials to facilitate discussion and ensure all vital aspects of the content are covered.
  3. Complete the Working Session Summary: After the session, use our template to compile a summary of all critical points discussed. This summary should capture the project’s scope, specific content requirements, and any client preferences outlined during the session.
  4. Client Sign-Off on Session Summary: Before proceeding, have the client review and sign off on the working session summary to confirm all information is correctly understood and agreed upon.
  5. Determine Necessary Brief Components: Refer to the table in this guide to decide which components are essential for your project brief. This step ensures the brief will include all the relevant sections needed for writers and editors to create content that aligns with the project goals. Aim for components that’ll contain information that doesn’t change at the individual article level.
  6. Draft the Project Brief: Using our project brief template, start drafting the project brief, focusing solely on information that will direct the content creation process. This includes detailed instructions on voice, style, content structure, and any specific content formats discussed during the working session. 
  7. Review of Style and Tone Guidelines: Incorporate detailed voice, tone, and style guidelines to ensure consistency across all content. This section should be informed directly by the client’s input and aligned with the target audience’s preferences.
  8. Peer Review by a Writer or an Editor: Have a writer or an editor review the draft brief. This step is crucial for identifying any potential blind spots or areas of confusion that can hinder content production.
  9. Test the Project Brief: Assign a writer who has no prior knowledge of the project to create a piece of content based on the brief. This test helps evaluate the clarity and completeness of the brief.
  10. Collect Feedback and Adjust the Brief: Gather feedback from the test phase and use it to refine the brief. Adjust any sections that are unclear or insufficient to ensure the brief effectively guides content creation.
  11. Finalize and Distribute the Project Brief: Once the brief is finalized and polished, distribute it to all relevant team members involved in the content creation process.
  12. Create Your Content Brief Template: With your completed project brief in hand, begin crafting the accompanying content brief template. 

Create a Reusable Content Brief Template: A 10-Step Guide

Developing a reusable content brief template is key to streamlining your content production process for a project. This 10-step guide provides the framework for creating a template that can be adapted to various content pieces within a project.

  1. Project Overview and Strategy Review: Begin by thoroughly reviewing the overall project’s strategy, goals, and target audience, as learned in the working session. This review helps inform the fundamental structure and components of your content brief template.
  2. Define Template Components: Use the component table in this guide to select essential elements that should be included in every content brief for this project. Avoid including components that are defined in the project brief or aren’t needed by the writer. 
  3. Organize the Flow of Information: Arrange the chosen components in a logical order that will make sense to writers and editors. Start with the broad information like title and content goals, then move into specifics like keywords, links, and call to action. Outlines are typically left for last. 
  4. Gather and Prepare Resources: Compile all necessary resources that will consistently be part of each content brief, such as a link to the project brief and any templates for specific types of content (e.g., blog posts vs. white papers). Having these resources at hand will ensure each individual content brief is easy to complete and accurate.
  5. Draft the Content Brief Template: Construct the template based on the organized flow of information. Ensure each section of the template is clear and provides guidance on how to fill it out. 

For example:

  • Introduction: Brief description of the content’s purpose within the project.
  • Keywords: Primary and secondary keywords to be included.
  • Content Objectives: Specific goals for the content piece (e.g., lead generation, educational, SEO-focused).
  • Required Links: A list of internal links that must be included in the content.
  • Content Outline: Outline of headings and key points to cover.
  • Call to Action: Specific actions the content should prompt from readers.
  1. Internal Review and Feedback: Have team members who will use the template, such as writers and editors, review it. This is to ensure the template addresses all necessary aspects of content creation and is clear in its instructions. Use their feedback to refine and improve the template.
  2. Pilot the Template: Test the template, along with the project brief, with one or two pieces of content to see how well it works in practice. This helps identify any areas where the template may be lacking or additional guidance is needed.
  3. Final Adjustments: Based on the pilot test, make any necessary adjustments to the template. This might involve adding additional sections, clarifying existing instructions, or rearranging components for better logical flow.
  4. Template Finalization and Distribution: Once the template is fully adjusted and approved, finalize it for regular use. Distribute the template to all relevant team members and provide a brief training session if necessary to ensure everyone understands how to use it effectively.
  5. Ongoing Updates and Revisions: As the project progresses, be open to making revisions to the template based on new insights, changing project needs, or feedback from content creators. This will help maintain the relevance and effectiveness of the template throughout the project’s duration.

Project Brief Template

Click here for an editable version of this template. Once it opens, click File>Make a Copy. 

Content Brief Template

Click here for an editable version of this template. Once it opens, click File>Make a Copy. 

Contact Page: Effective briefs are essential to producing outstanding content consistently. For information on how Stellar can help with brief creation, contact your account or content manager. Prospective clients can connect with us at sales@stellarcontent.com

Working Session Summary Form

Two colleagues collaborating at a desk with laptop and papers on an orange background

Project Overview

  • Client Name:
  • Project Name:
  • Date of Working Session:
  • Attendees:

Content Goals

  • Main objectives of the content:
    Clearly define the goals of the content. For example, increase brand awareness, drive website traffic, generate leads, educate the audience, or enhance customer engagement. These objectives guide the content strategy, ensuring it aligns with the client’s business needs.
  • Key performance indicators (KPIs) for success:
    Identify specific KPIs to measure content success, such as page views, conversion rates, average time on page, social shares, or lead generation. Setting clear KPIs helps track the effectiveness of content and informs future strategies.

Target Audience

  • Demographics: [Specify target audience demographics, such as age, gender, location, income level, etc.]
  • Psychographics: [Describe lifestyle, values, interests, attitudes, and other psychological traits relevant to the target audience.]
  • Pain points and challenges:
    Understand and detail the primary pain points and challenges faced by the audience. For example, frustrations with current solutions, time constraints, financial limitations, or lack of trust. Addressing these helps in crafting content that resonates and provides value.

Content Specifications

  • Content types: [Specify content types, such as blog posts, social media updates, white papers, etc.]
  • Tone and voice:
    Define the tone and voice to ensure consistency. Should it be formal, casual, friendly, or authoritative? Clarify how the brand’s personality should be conveyed in the content.
  • Style guidelines:
    Include any style preferences or adherence to specific style guides (e.g., AP Style, Chicago Manual of Style) or custom brand guidelines to maintain consistency.
  • Preferred structure: [Outline the desired structure, such as headings, subheadings, bullet points, etc.]
  • SEO considerations:
    Detail SEO best practices, including targeted keywords, meta descriptions, headers, and alt text requirements. Optimizing content for search engines improves visibility and rankings.
  • Linking strategy: [Define internal and external linking strategies to support SEO and user navigation.]
  • Calls to action (CTAs):
    Clearly state the desired CTAs, such as signing up for a newsletter, making a purchase, or downloading a resource, to guide user engagement and conversions.
  • Word count range: [Specify the desired word count range for each content type.]

Client Preferences and Special Requirements

  • Brand-specific guidelines: [Include any unique brand guidelines that must be followed.]
  • Competitor considerations: [Mention any competitor content that should be reviewed or avoided.]
  • Any additional requirements: [List any other specific requirements from the client.]

Project Logistics

  • Content volume and frequency:
    Clarify the amount of content needed and the frequency of delivery, such as the number of blog posts per month, social media updates per week, etc.
  • Submission process: [Describe how drafts will be submitted for review.]
  • Delivery process and format: [Specify the preferred delivery format (e.g., Word, Google Docs).]
  • Content calendar: [Provide a content calendar outlining deadlines for drafts, reviews, and final submissions.]
  • Client review and feedback process:
    Detail the review process, including who will provide feedback, the number of revision cycles, and any deadlines for feedback to ensure a smooth content production process.

Calibration

  • Calibration resources provided: [List any resources provided for calibration.]
  • Calibration dates: [Specify any key calibration dates.]
  • Calibration feedback call scheduled: [Include details on any scheduled calls for calibration feedback.]

Next Steps

  1. [Action item 1]:
    • Responsible party: [Name]
    • Deadline: [Date]
  2. [Action item 2]:
    • Responsible party: [Name]
    • Deadline: [Date]
  3. [Action item 3]:
    • Responsible party: [Name]
    • Deadline: [Date]

Content Production Working Session

Two colleagues smiling while reviewing a tablet and notebook on a blue background

Welcome to the Content Production Working Session, a pivotal first step in our collaboration. This session is designed to ensure a seamless alignment between your team and ours. It’s where we dive deep into the essential elements of your content and the logistical details of the project to solidify our understanding and prepare for effective execution. 

It’s critical for those who’ll be placing content orders and evaluating the delivered content to attend. Our goal is to gather comprehensive insights to create accurate project briefs, train our writers and editors effectively, build efficient workflows, and ensure the content we deliver meets your expectations precisely.

Pre-Session Preparation Checklist

To ensure our working session is as productive as possible, please complete the following tasks before our call:

  • Review Our Style Guide: Familiarize yourself with our in-house style guide, based on AP Style, and note any specific exceptions or adaptations your content requires.
  • Send Calibration Content Briefs: Provide content briefs for 2-3 calibration pieces at least 48 hours before the session.
  • Share Essential Resources: Submit any additional materials that will aid in content creation, such as your own style guides, voice guidelines, audience personas, or examples of target content.
  • Prepare: Be prepared to discuss the topics below during the call.

Agenda:

  1. Introductions
  2. Scope/Agreement Review
  3. Communication Preferences
  4. Workflow Roles
  5. Project and Goals Overview
  6. Content Briefs
  7. Voice
  8. Style
  9. Structure
  10. Optimization
  11. Linking
  12. CTAs
  13. Special Requirements
  14. Project Logistics
  15. Calibration
  16. Feedback
  17. Touchbases
  18. Next Steps

E-Comm Content Production Working Session

Two people excitedly reviewing content on a laptop near shipping boxes on an orange background

Welcome to the Content Production Working Session, a pivotal first step in our collaboration! This session is designed to ensure a seamless alignment between your team and ours. It’s where we dive deep into the essential elements of your content and the logistical details of the project to solidify our understanding and prepare for effective execution. 

It’s critical for those who’ll be placing content orders and evaluating the delivered content to attend. Our goal is to gather comprehensive insights to create accurate project briefs, train our writers and editors effectively, build efficient workflows, and ensure the content we deliver meets your expectations precisely.

Pre-Session Preparation Checklist

To ensure our working session is as productive as possible, please complete the following tasks before our call:

  • Review Our Style Guide: Familiarize yourself with our in-house style guide, based on AP Style, and note any specific exceptions or adaptations your content requires.
  • Send Calibration Resources: Provide resources for calibration at least 48 hours prior to the working session. For PDs, send URLs or manufacturer links (or other agreed-upon resources) for 5 to 10 orders. For longer-form content, such as category page footers, please send 2 or 3 briefs.
  • Share Essential Resources: Submit any additional materials that will aid in content creation, such as your own style guides, voice guidelines, audience personas, product images, or examples of target content.
  • Prepare: Be prepared to discuss the topics below during the call.

Agenda:

  1. Introductions
  2. Scope/Agreement Review
  3. Communication Preferences
  4. Workflow Roles
  5. Project and Goals Overview
  6. Product Resources
  7. Data/Information Sourcing
  8. Specs/Features/Variations
  9. Voice
  10. Style
  11. Format and Structure
  12. Optimization
  13. Linking
  14. CTAs
  15. Special Requirements
  16. Project Logistics
  17. Calibration
  18. Feedback
  19. Touchbases
  20. Next Steps